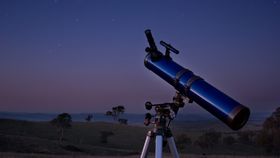


With the holiday shopping season upon us, it can be challenging to pick out gifts that will be appreciated and last for a long time. Consider buying a loved one a telescope, giving them access to the universe through the night sky. Astrophysicist Neil deGrasse Tyson was 11 when he received his first telescope and “saw the sky as the universe had intended it to be seen.” Amateur astronomy is a great hobby that can be picked up at any age, and it can even bring groups of people together during noteworthy skywatching events.
The rest of this article is behind a paywall. Please sign in or subscribe to access the full content.There are so many things to learn about astronomy and telescopes, all relevant information could never fit into one article. However, the process can be a bit daunting, and this guide is meant to serve as a good starting point to choose a telescope that will best suit the needs of the user.
Where to Begin?
Binoculars
Price is a large factor for many people purchasing a telescope for the first time. They reason that they’ll try something inexpensive just to get a feel for it and see if they like it, and then upgrade later if needed. All telescopes are not created equally, and getting something too poor quality can result in a lot of disappointment and frustration, possibly destroying the curiosity and enthusiasm toward astronomy.
For those who are restricted to a modest budget and cannot spend more than $75, binoculars are a better value than a similarly priced telescope. Binoculars can provide amazing optics for the same price as a subpar telescope. The principles of astronomy can be easily learned with binoculars, and using both eyes can be an advantage at times. Even experienced astronomers use binoculars. It’s probably a good idea to invest in a pair to start anyway.
Aperture
The first and most important aspect to consider when purchasing a telescope is the equipment’s aperture, which is the diameter of the lens or mirror in the telescope that will collect light and direct it into your pupil. The larger the aperture, the more light can be collected, and the brighter and sharper the sky will appear.
However, it’s not as simple as “bigger is better” because a larger aperture will result in a larger, heavier telescope. If the telescope is too heavy to be pulled out and used very often, it doesn’t really matter how clear the images are. If someone lives in a remote area with room to store a larger telescope, going for a large aperture is just fine. Someone living in a city who needs to transport the telescope to darker skies will likely want something smaller, lighter, and easier to move around.
How large objects look through the telescope is adjusted with eyepieces that can be switched out depending on need. Though the aperture doesn’t do any magnifying itself, it does affect which eyepieces will be best suited for it.
Field of View
The field of view, or the width of what can be seen through the telescope, can be calculated based on the specs of the equipment. The power of the telescope is a function of the telescope's focal length over the focal length of the eyepiece. The apparent field of view is then divided by the power, producing the telescope's true field of view. The optimum field of view is dependant on what objects you plan to observe.
Power/Magnification
Eyepieces come in a variety of sizes and should be selected after purchasing a telescope, ensuring that they will fit on the equipment, have the proper focal length, and provide the best possible view.
While it can be highly desirable to use an eyepiece with the highest magnification possible in order to see the most detail of an object in the sky, the telescope’s aperture sets a limit on what can be viewed well. Generally, 50x per inch of the aperture is the maximum magnification power recommended.
Exceeding this will result in objects that appear blurry, which can be quite frustrating. The quality of the optics will also affect maximum power that can be used. A small, inexpensive telescope at a local store might promise 500x magnification, but will not be able to deliver and end up as a waste of time and money.
Types of Telescopes
Optical telescopes differ in the way they collect light and form an image, that each have pros and cons, based on what is needed.
Refractor
Refractor telescopes have been in use since the early 1600s and are very traditional-looking. An objective lens bends light through an enclosed tube, and an eyepiece lens straightens the image back out on the other end, making it look clear. Refracting telescopes are well-known for providing great detail when looking at the moon and planets.
Because the lenses are fixed within a sealed tube, it is not possible for dust to get in and need to be cleaned off the lenses. This drastically reduces the amount of maintenance required in caring for the equipment. Additionally, this gives the telescope a bit of durability, as the lenses will not shift around or need to be collimated before use.
Pros: Low maintenance, sharp details on bright objects, can be used to see across great distances on land
Cons: More expensive in regards to aperture size, smaller aperture size, not great for faint or deep sky viewing
Szőcs Tamás via Wikimedia Commons
Reflector
Reflecting telescopes create images by allowing light in through the aperture on one end of the tube and bouncing it off of a curved, primary mirror on the opposite side. That image bounces to a flat secondary mirror near the aperture, where it is magnified and directed toward the eyepiece. They generally have larger apertures than refractors, allowing them to view fainter objects than refractors.
There are many different types of reflecting telescopes with different configurations for the secondary mirror and eyepiece, but they are relatively shorter than refractor telescopes, making it easier to transport. Additionally, they can easily be mounted for secure, sturdy viewing. Dobsonian telescopes are fairly large, but produce amazing images.
Pros: Large aperture, less expensive aperture size, easy to transport, stable
Cons: Optics will need to be cleaned, mirrors can become misaligned
Light path of a Newtonian telescope. Credit: Krishnavedala via Wikimedia Commons
Catadioptric
Catadioptric telescopes are essentially hybrids of reflectors and refractors, using both lenses and mirrors to create an image. Light first passes through a correcting lens before it is bounced off of a curved primary mirror, onto a flat secondary mirror, and then to the eyepiece. This essentially “folds” the optics, allowing an incredibly detailed image to be produced in a relatively small space. An enclosed tube design lessens the amount of dust that gets inside, but will occasionally need to be cleaned.
There are two main types of catadioptric telescopes: Schmidt-Cassegrain and the Maksutov-Cassegrain. Maksutov’s use a thicker lens and smaller secondary mirror than the Schmidt telescopes. Though this does make them slightly heavier, it produces a slightly sharper image.
Pros: Internal dust minimized, large aperture, great for astrophotography
Cons: Lenses need to be collimated, more expensive than reflectors
Light path of a Schmidt-Cassegrain telescope. Credit: Griffenjbs via Wikimedia Commons
Mounts
Many telescopes use tripod mounts, and it is important to select one that is heavy and sturdy enough so the telescope can be moved smoothly and securely.
Non-computerized altazimuth mounts are a more inexpensive option, but are not ideal for viewing objects deep in space. Computerized altazimuth mounts are able to use coordinates and be pointed precisely toward a certain object in the sky.
Equatorial mounts are able to track objects in relation to Earth’s rotation, which is needed for viewing faint and distant objects over time. This motion can be done manually or through a motor. The additional cost associated with equatorial mounts may be more than what is needed for most beginner astronomers.
Next Steps
Anyone can own a fancy telescope, but knowing how to use it correctly is what makes someone an astronomer. Learning how to identify constellations and use those as landmarks to find other targets is critically important and will take some effort, but isn’t overly complicated or impossible even for younger sky watchers. When getting started, it can be extremely helpful to join a local astronomy club and have someone with experience demonstrate how to use the telescope’s features and help locate targets in the sky. Seasoned amateur astronomers can also help explain environmental factors that could be influencing the view, such as high humidity.
Additionally, there are many books geared to beginner astronomers of all ages to introduce the basic concepts necessary for navigating the night sky. Books alone are no substitute for the hands-on experience gained from learning with a group in an astronomy club, but they are fantastic supplements.
Note: An earlier edition of this article incorrectly stated that a wider aperature would produce a wider field of view. This has been corrected.